NemoClaw Setup: Thinkpad T14s, Debian 13.4
Prep
Hardware
- Pick your device.
- I with with a T14s, running Debian 13 “Trixie”
Accounts
- Setup your Nvidia account if you don’t have one.
- You’ll also need a build.nvidia.com account
- Generate your API key
- Setup OpenAI Keys (Or other provider)
- This will be handy as the agent swarm expands
Docker
Run the following command to uninstall all conflicting packages:
sudo apt remove $(dpkg --get-selections docker.io docker-compose docker-doc podman-docker containerd runc | cut -f1)
Install using the apt repository
# Add Docker's official GPG key:
sudo apt update
sudo apt install ca-certificates curl
sudo install -m 0755 -d /etc/apt/keyrings
sudo curl -fsSL https://download.docker.com/linux/debian/gpg -o /etc/apt/keyrings/docker.asc
sudo chmod a+r /etc/apt/keyrings/docker.asc

# Add the repository to Apt sources:
sudo tee /etc/apt/sources.list.d/docker.sources <<EOF
Types: deb
URIs: https://download.docker.com/linux/debian
Suites: $(. /etc/os-release && echo "$VERSION_CODENAME")
Components: stable
Signed-By: /etc/apt/keyrings/docker.asc
EOF

sudo apt update
OpenShell
UV https://docs.astral.sh/uv/getting-started/installation/
curl -LsSf https://astral.sh/uv/install.sh | sh
https://docs.nvidia.com/openshell/latest/get-started/quickstart.html
uv tool install -U openshell
Docker update and restart
echo '{"default-cgroupns-mode": "host"}' | sudo tee /etc/docker/daemon.json > /dev/null
systemctl restart docker
Update Docker
sudo usermod -aG docker UserName
newgrp docker
NemoClaw
https://docs.nvidia.com/nemoclaw/latest/get-started/quickstart.html
curl -fsSL https://www.nvidia.com/nemoclaw.sh | bash
Setup Screen
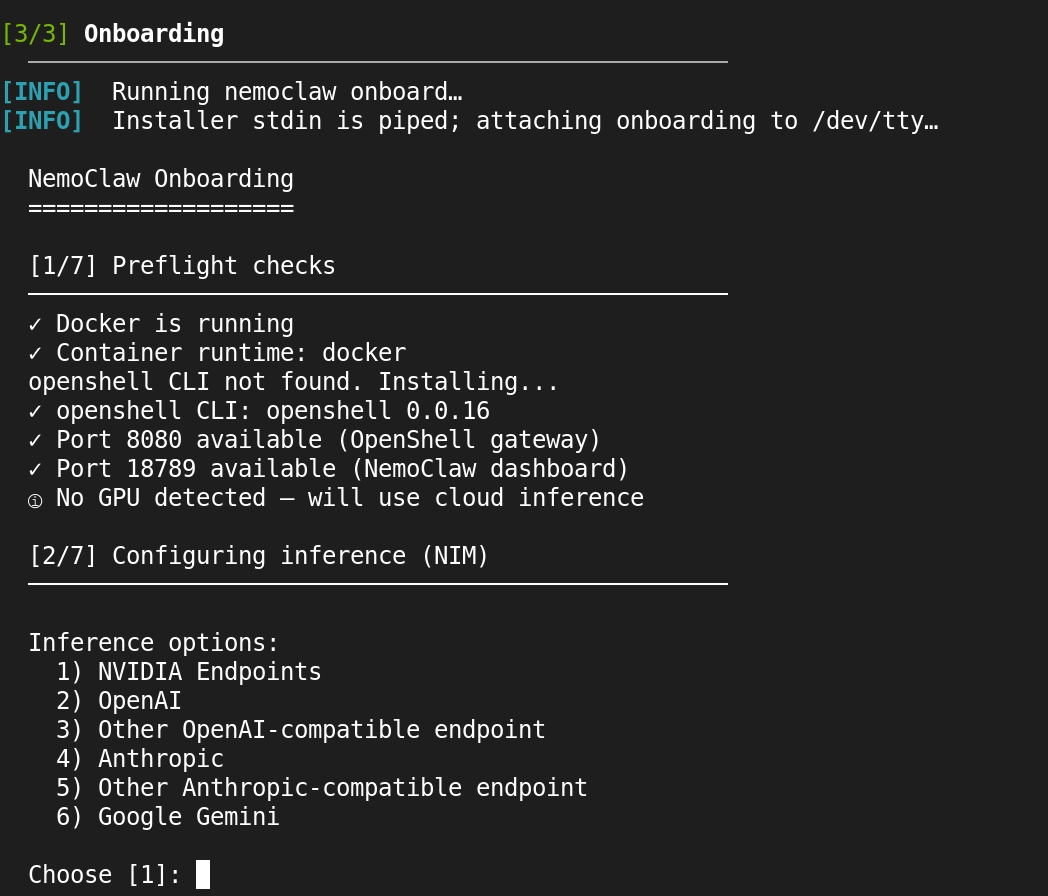
- Choose 1, and setup NVIDIA
- Enter Nvidia API key
- Choose Nemotron
- Enter Sandbox name
- function of main agent
my-assistant
- function of main agent
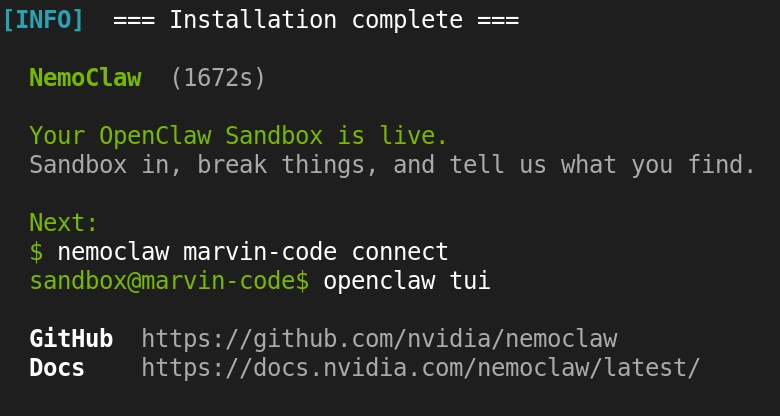
Capture your OpenClaw link
http://127.0.0.1:18789/#token=…
NOTE:
If you’re planning to run this on a laptop as I have, and then access it via ssh & the web GUI; you may want to consider tmux to manager your ssh shell sessions. DevOps Toolbox offers a great tutorial Tmux From Scratch To BEAST MODE tmux Cheat Sheet
Congratulations
You now have your OpenShell security wrapper running around a sandboxed OpenClaw, with NemoClaw as the control layer between the two; this is the down and dirty guide from notes to myself on how to set this up again. There will be way more context provided if you follow a polished guide on youtube that I’m sure are to come soon. For my part, I’ll try to share what I learn by posting the rough notes and links to the best resources I find.
This was really just to start documenting my journey with NemoClaw (this will be an ongoing series) and get the post up.
I also wanted to showcase that it’s not required to run Ubuntu to have OpenShell and in turn NemoClaw.
Read the Docs
OpenShell
https://docs.nvidia.com/openshell/latest/index.html
NemoClaw
https://docs.nvidia.com/nemoclaw/latest/index.html
This Weekend & Beyond
- I still have to finish reading all the docs related to OpenShell.
- Document how to make templates for network policies.
- Design the agent swarm.
- Create or Remix agent profiles
- super prompts turned into:
- Soul.md
- Identity.md
- Memory.md
- Skills.md
- Setup the local MCP server and then policy control each agent’s access to the skill_vault (markdown file directory with an obsidian wrapper)
- super prompts turned into:
- Create or Remix agent profiles
- Before the swarm is up, I’ll also connect at least the orchestration agent to a few Discord servers.